Fun fact: Chocolate covered strawberries are super easy to do yourself! I recently made these for my friend's baby shower.
Ingredients I used
-Strawberries
-Guittard Old Dutch (chocolate chips)
-Vanilla Drops (white chips)
-Red food coloring
First wash and dry your lovely strawberries.
Then melt your chips. I found these at "Kitchen Kneads", but I'm pretty sure you can find some at a craft store or even walmart depending on the time of year. I just used a regular cereal bowl (microwavable) and melted the chips in the microwave 30 sec at a time. For the pink, I just used some white chips and added a drop or two of red food coloring.
Now for the dipping! Pretty self explanatory.. cover the strawberry. Might be useful to have a spoon to help cover. Near the end, I had to tip my bowl to get good coverage. Place in the fridge for a few min before moving on.
Last thing.. the drizzle! Melt a few more chips of all the colors you'd like to use (unless you have some extra from the dipping). Place in a ziplock baggie and cut the corner. Drizzle over opposite colors. Note to self: the vanilla stuff comes out a lot faster than the chocolate, so be prepared :P
See, that wasn't so bad! Happy dipping!
12.12.2010
Pin the..
My friend and I recently threw a shower; we came up with this spin on an original game :]
Pin the sperm on the egg
-Poster board
-markers
-yarn
Color/Cut out shapes that resemble an egg and some sperm. For these I traced a bowl and a cookie cutter. Then paper punch a hole and tie some yarn for the tail ;] Pretty easy and funny!
Pin the sperm on the egg
-Poster board
-markers
-yarn
Color/Cut out shapes that resemble an egg and some sperm. For these I traced a bowl and a cookie cutter. Then paper punch a hole and tie some yarn for the tail ;] Pretty easy and funny!
11.24.2010
Cake Bites
Just in time for the holidays! Everyone has heard of the adorable cake pops.. here's my twist.
Bake desired cake mix as directed. Let cool, then crumble into a bowl. Mix in 1 16oz tub of your fave frosting, then put in the fridge. After at least an hour or so, take out and form little bite size balls. Then dip them in chocolate and add sprinkles. YUM!
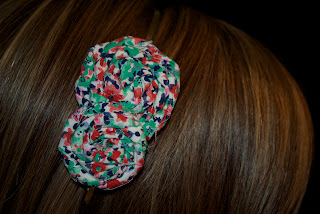
add on {fabric flower}
Here's a fun and easy flower that you can add to just about anything.
Start out by cutting desired width of fabric the entire length of the ream. Keep in mind that the size of your flower will be double the size you cut. For this one I did 1 inch. For a less "fluffy" flower, do a shorter piece of fabric.
Thread your needle and tie a knot at the end. Then do a running stitch on one side from end to end, lightly pulling as you go.. it will start to curl up as you go.
When you get to the end, stitch through all layers so it holds together. For the middle.. You can use whatever you'd like: button, jewel etc. I used some leftover fabric to make a ball, then wrapped/sewed more fabric around it (so it makes a little pin cushion thingy). To each her own :]
Lastly, decide what you want to attach it to.. pin, clip, headband, pillow, whatever!
There you have it! Here's a bigger one that I did with a shorter piece of fabric. Let me know if you have any questions :]
Credit goes to V and Co
11.21.2010
{Christmas Advents} Magnet Board
All this snow has got me excited for Christmas! This cute countdown was brought to you by my good friend Romney. She invited me over to craft it up at her place :]
Romney found this cute Christmas themed paper at the craft store. All she had to do was cut and laminate them. Then we attached magnets on the back of each one.
Then she printed off some fun Christmas/winter activities.. We cut them into little strips; folded them and placed one activity behind each magnet. Starting with December first, you and your family can enjoy fun activities as you countdown to Christmas! Some of the activities that were bigger, or took more time could be placed behind the days that fell on the weekend.
If you don't already have a magnet board.. they sell some at the craft store (usually unfinished).
For some other cute {Christmas Advents}.. Click here and scroll down the page.
Rose Cuff Bracelet
The credit for this one goes to my awesome sister, Amber :] A few months ago, my sis and I were trying to come up with something cute to make for my brother's wedding.. This was our "no sew" take on these adorable rose cuff bracelets. You can find the original tutorial here.
We used ribbon instead of felt, and just folded and hot glued the ends so they didn't fray. We also used the adhesive velcro. All the girls in my family wore these for the wedding.. even the little girls had some :] Super cute and super easy!!
Amber- Sorry I beat you to posting this.. You can add your pics to the post :]
11.07.2010
Pine Cone Swag
-pine cones
-paint
-ribbon
-copper wire
Directions
-First, bake the cones on a foil-lined cookie sheet for about 45 minutes to an hour at 200 degrees. This kills any bugs or spider mites that live in them. This also allows the seeds to fall out and sap to dry up.
-Paint your pine cones
-Wrap the wire around the bottom of the cone, slipping the wire between the open scales.
-Tie staggering ribbon lengths to pine cones and tie all together at the top.
10.29.2010
Switchable Rosette Headbands
Headbands are the best; and when you make them yourself, they're even better! First- start out with a plain headband; metal or plastic (whatever works for you and is comfortable). I scored these metal ones here. Hot glue some velcro+felt (same size as the velcro on the backside). You might want a mirror handy to make sure you attach the velcro where you want it.
Second- make your rosettes (or whatever embellishment you want). Click here for the super easy tutorial. The thing I love about these is that they don't have to be perfect ;) For these I used hot glue, but fabric glue also works very well.
Then attach the fuzzy side of the velcro to your flowers.
There you have it!
You can make others to change out. For these I just glued one flower slightly on top of the other one.
Here's another example of what you can do. The possibilities are endless!! Have fun :]
Amber and I made some of these while I was visiting her.. She will have to post some pics of her variation.. hint hint ;)
10.21.2010
Swamp Creatures
Found this cute Halloween recipe here, but don't laugh too hard at how mine turned out nothing like theirs HA! I used cream of spinach instead of sautéed spinach and black olives instead of green. My only advice is to cook them in the muffin tin as long as it says.. I got a little impatient and I think that's why they kinda fell apart. Still cute and fun nonetheless!
10.16.2010
free {PS actions}
These awesome actions are FREE and easy to use! Click here and scroll down to download the zip files. Let me know if you have any questions on how to use them. I <3 Photoshop! Isn't my niece cute!!?
10.15.2010
{lima bean} wreath
The idea for my latest project came from my awesome sister! She spotted this step by step tutorial here. It was such a fun and inexpensive craft. I also loved to see all the other variations people used: acorns, candy corns or kidney beans. Just be careful not to burn yourself and let me know if you have any questions!
Here is Amber's take on the {lima bean} wreath.. CUTE!
personal {gift tags}
I know it's WAY too early to be thinking about Christmas.. or is it? Here are some gift tag ideas that you can use for gifts any time of the year. If you have 2 names in your family that start with the same letter, you could just use different colors.
Found the gift tag templates here.
Found the gift tag templates here.
 |
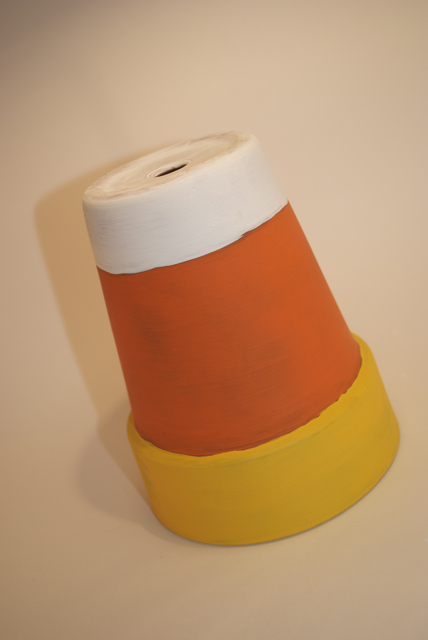
{candy corn} pots
If you're looking for a cute, easy, inexpensive craft for Halloween.. You've come to the right place! All you need is a clay gardening pot and some paint!
cute as a {button}
These cute earrings were one of the easiest craft projects I've ever done. I got the idea from a cute boutique in Seattle.. I was this close to buying a pair for $5 and I thought, "I can totally make these!" And so can YOU!
First- You'll need some earring post pads found at your local craft store. I found these at Michael's (PS- they're ok for sensitive ears). Also grab backs too.. I personally prefer the clear ones.
First- You'll need some earring post pads found at your local craft store. I found these at Michael's (PS- they're ok for sensitive ears). Also grab backs too.. I personally prefer the clear ones.
Second- Find some cute buttons in the color you want. These came in a package of 75 I believe (Lot's of earrings!!) My sister, Amber, had a pair of button earrings in the 80's.. I think that's why I bought neon colors to recreate them :P
Third- Place a dot of hot glue on the post pad and add your button! Easy as pie! Just be careful not to burn yourself. You can give these bad boys as a present, put them on your adorable little girl or keep them for yourself ;]
10.11.2010
welcome!
Welcome to my creative blog! I'm really excited to share some of my ideas with everyone, and I hope you will share some too!
Subscribe to:
Comments (Atom)


